

Installing SNAC Fediverse Server on Ubuntu
I’ve taken on some larger, complex fediverse installs like Bonfire, and Mastodon. And some single user ones like GoToSocial. Heck, I even configured a Bluesky PDS. This time around, I’ve going even smaller. Snac is the NEXT to smallest install I’ve done so far. A minimalist ActivityPub server that could probably run on just about anything.
Why Snac?
What caught my attention was its incredibly small footprint and simple architecture. No complicated database setups, no Redis caching - just a straightforward C application that handles ActivityPub federation. It’s refreshing to see something so lightweight in the typically resource-heavy fediverse landscape.
One other feature I like is that by default, SNAC does NOT download all external media. That means the only media you’ll be storing is the media YOU post. This is unlike most fediverse platforms which require a ton of local storage or an S3 bucket configuration.
System Requirements
Remember when I said it could run on just about anything? I wasn’t kidding. Here’s what I allocated:
- Memory: 1GB RAM (extreme overkill - it uses way less)
- CPU: 1 core (barely touched)
- Storage: 32GB SSD (plenty for a personal instance)
- OS: Ubuntu (from my Proxmox template)
Compare this to Mastodon’s minimum requirements of 2GB RAM and multiple cores, and you start to see why Snac is interesting for personal instances.
My Homelab Setup
The setup uses the following flow:
1

Internet (443) -> HomeLab > NGINX Proxy Manager -> VM (snac)
- An Ubuntu VM (created from a Proxmox template)
- NGINX Proxy Manager on a SEPARATE server
- Domain with proper DNS configuration
- SSL certificate (can be obtained through Let’s Encrypt, NGINX made this easy)
Installation Steps
1. Create System User
Create a dedicated system user for snac and make note of the password.
1
2

sudo useradd -r -m -s /bin/bash snac
sudo passwd snac
2. Install Dependencies
1
2

sudo apt update
sudo apt install git libssl-dev libcurl4-openssl-dev build-essential
3. Download and Compile Snac
Log in as the snac user and set up directories:
1
2
3
4
5
6
7
8
9
10

sudo su - snac
mkdir -p ~/src
mkdir -p ~/data

# Clone and compile
cd ~/src
git clone https://codeberg.org/grunfink/snac2.git
cd snac2
make LDFLAGS=-lrt
sudo make install
4. Initialize Snac
1

snac init ~/data
During initialization, you’ll need to provide:
- Host name: example.domain
- Path prefix: (leave empty for root, defaults to /social)
- Network address: 127.0.0.1 (I later had to change this to 0.0.0.0)
- Port: 8001
5. Configure Systemd Service
Create a systemd service file:
1

sudo nano /etc/systemd/system/snac.service
Add the following content:
1
2
3
4
5
6
7
8
9
10
11
12
13

[Unit]
Description=snac ActivityPub Server
After=network.target

[Service]
Type=simple
User=snac
Group=snac
ExecStart=/usr/local/bin/snac httpd /home/snac/data
Restart=always

[Install]
WantedBy=multi-user.target
Enable and start the service:
1
2
3

sudo systemctl daemon-reload
sudo systemctl enable snac.service
sudo systemctl start snac.service
6. Configure Network Access
Edit the server configuration to allow external access:
1

vim ~/data/server.json
I had to update the address field so the site was accessible to my NGINX Proxy Manager, since that runs on a different server within my homelab. Switched it from 127.0.0.1 to 0.0.0.0 which allows external communication out on all ports.
1
2
3
4

{
    "address": "0.0.0.0",
    ...
}
7. Configure NGINX Proxy Manager
Create a new proxy host with the following locations. Let me tell you this was annoying to handle via NGINX Proxy Manager! Rather than a single file I could add these all to, I had to point and click and add each location separately. It worked, tho. And probably in the end the UI is just creating that same file behind the scenes…. Double check your work because this is easy to mess up and difficult to troubleshoot.
Repeat, repeat, repeat. This is just the first 1st locations show in NGINX PM as example - look below for all 7.
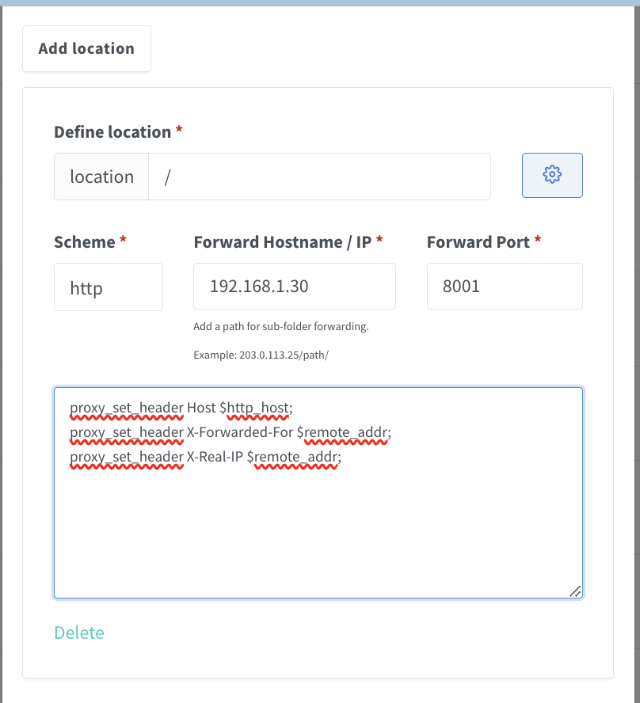
- Root Location:
1
2

Location: /
Forward: http://VM_IP:8001
- WebFinger:
1
2

Location: /.well-known/webfinger
Forward: http://VM_IP:8001
- Mastodon API v1:
1
2

Location: /api/v1
Forward: http://VM_IP:8001
- Mastodon API v2:
1
2

Location: /api/v2
Forward: http://VM_IP:8001
- OAuth:
1
2

Location: /oauth
Forward: http://VM_IP:8001
- NodeInfo:
1
2

Location: /.well-known/nodeinfo
Forward: http://VM_IP:8001
- Host Meta:
1
2

Location: /.well-known/host-meta
Forward: http://VM_IP:8001
- Share:
1
2

Location: /share
Forward: http://VM_IP:8001
- Authorize Interaction:
1
2

Location: /authorize_interaction
Forward: http://VM_IP:8001
For each location, add the following custom configuration:
1
2
3

proxy_set_header Host $http_host;
proxy_set_header X-Forwarded-For $remote_addr;
proxy_set_header X-Real-IP $remote_addr;
8. Create User Account
1

snac adduser ~/data
Follow the prompts to create your user account.
9. Configure Instance Settings
Edit server.json to set instance details:
1
2
3
4
5
6

{
    "admin_email": "[email protected]",
    "admin_account": "your-username",
    "title": "Your Instance Title",
    "short_description": "Your instance description"
}
You’re up!
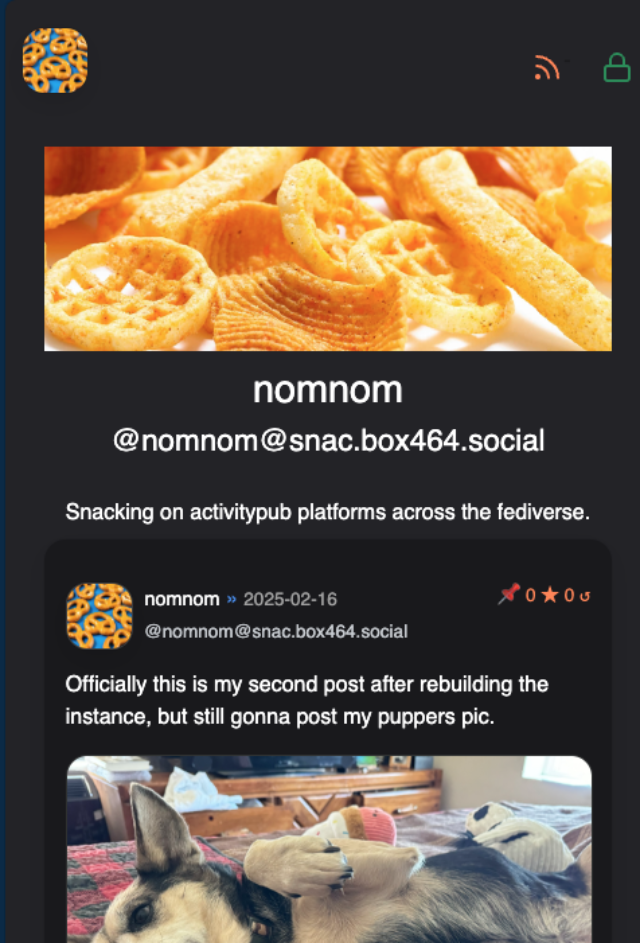
At this point you can check to see if your snac instance is working. You should see something like this.
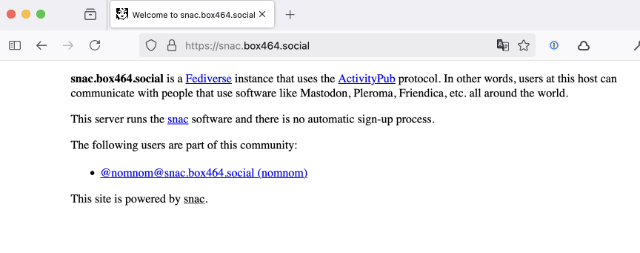
Note the user listed - click on it and you’ll see the PUBLIC page for this user that everyone can see.
On the public page, you can see a couple of URLs “RSS” and “Private”.
Private sends you to a page that allows you to post, follow, all kinds of fediverse things. You’ll need your username and password to get there.
Compatibilty with the Mastodon API
Snac is compatible with the Mastodon API, which means you can use Mastodon clients to interact with your instance. This is a huge plus, as it opens up a wide range of clients and apps that can be used with your instance. I’ve tried Phanpy, FediText, Ivory - they all work great!
Customization
You can customize your instance with your own css styling, or use an existing theme.
Styling
- Global styling (public pages):
- Edit
/home/snac/data/style.css - Note: The homepage (served from greeting.html) does not include styling by default
- The style.css file only affects profile pages, timelines, and other ActivityPub-related pages
- If you want to style the homepage, you’ll need to add CSS directly in greeting.html
- Edit
- User-specific styling (private pages):
- Edit
/home/snac/data/user/username/static/style.css - This affects the logged-in view for that specific user
- Edit
I customized my public and private page styles like this. All the same functionality, just themed.
Emojis
Yes! You can have custom emojis. I have not delved into this yet, but here’s the documentation.
Snac Custom Emoji Configuration
Troubleshooting
File Permissions
Ensure correct permissions:
1
2

sudo chown -R snac:snac /home/snac/data
sudo chmod 660 /home/snac/data/style.css
Service Issues
Check service status:
1
2

sudo systemctl status snac.service
sudo journalctl -u snac.service
Cache Issues
- Add cache-control headers in NGINX
- Perform hard refresh in browser
Maintenance
Updating Snac
I have not had to do this yet, but this would be the steps to follow to update snac after a new version is available…I think.
Careful, I didn’t run these commands…for future reference!
1
2
3
4
5

cd ~/src/snac2
git pull
make LDFLAGS=-lrt
sudo make install
sudo systemctl restart snac.service
Backups
Remember that snac uses hard links, so when backing up make sure to use these extra flags to follow the hard links (-H) and preserve them during the sync (-H).
I still don’t understand all the specifics of hard links, just know that without these flags, you’ll be backing up duplicate data and may break snac’s internal file organization and fail when you try to restore from it later.
If you see something wrong with these scripts, please let me know!
Since I’m running this on ProxMox and I take a full backup of the server nightly…I admit I’m not too concerned about data loss, mostly because this is just a hobby instance.
1
2
3
4
5

# Using tar
tar -czf backup.tar.gz -H /home/snac/data

# Using rsync
rsync -avH /home/snac/data /backup/location
Resources
Official Documentation
- Snac Source Code - The main repository
- Online Snac Manuals - User, administrator, and data formats documentation
- Snac Custom Emoji Configuration - How to set up custom emojis
Themes
- Collection of Snac Themes - by Ворон
Installation Guides
- Install Snac on FreeBSD - by gyptazy
- Run Your Own Social Network - by Giacomo Tesio
Further Reading
- Understanding Hard Links - Because I still don’t fully understand them 😅
- ActivityPub Protocol - The standard that makes federation possible
Comments
Total Interactions: 1Likes
Posts, Re-Posts and Bookmarks
No webmentions were found.
Replies
No webmentions were found.